Jamie
Jamiewp:paragraph
Over time, web browsers store temporary files, cookies, and other data to improve browsing speed.
/wp:paragraph
wp:paragraph
However, these files can accumulate, potentially causing slow loading times, connection issues, or privacy concerns.
/wp:paragraph
wp:paragraph
Clearing the cache on your iPhone can help free up space, resolve minor glitches, and protect your browsing history from prying eyes.
/wp:paragraph
wp:paragraph
Below, we’ll go over the step-by-step methods for clearing cached data on different web browsers, including Safari, Google Chrome, Mozilla Firefox, and Microsoft Edge.
/wp:paragraph
wp:image {“id”:12063,”width”:”654px”,”height”:”auto”,”sizeSlug”:”full”,”linkDestination”:”media”,”align”:”center”}
/wp:image
wp:heading
Clearing Cache in Safari
/wp:heading
wp:paragraph
Safari is the default browser on all iPhones, and Apple provides a simple way to clear its cache, cookies, and browsing history. Follow these steps:
/wp:paragraph
wp:heading {“level”:3}
Step 1: Open Settings
/wp:heading
wp:paragraph
Locate and open the Settings app on your iPhone. This is a gray icon with gears, usually found on the home screen.
/wp:paragraph
wp:paragraph
If you can’t find it, swipe down from the middle of the screen and type “Settings” in the search bar.
/wp:paragraph
wp:heading {“level”:3}
Step 2: Scroll Down and Select Safari
/wp:heading
wp:paragraph
Once inside Settings, scroll down until you see Safari with a small blue compass icon. Tap on it to open Safari settings.
/wp:paragraph
wp:heading {“level”:3}
Step 3: Tap “Clear History and Website Data”
/wp:heading
wp:paragraph
Scroll down until you find the Clear History and Website Data option. Tap on it, and a pop-up confirmation window will appear.
/wp:paragraph
wp:heading {“level”:3}
Step 4: Choose “All History”
/wp:heading
wp:paragraph
You’ll be given the option to clear browsing data from different timeframes. Select All History to completely remove cached data, cookies, and history.
/wp:paragraph
wp:heading {“level”:3}
Step 5: Confirm by Tapping “Clear History”
/wp:heading
wp:paragraph
Tap Clear History to finalize the process. This will remove cached data across all Apple devices where you’re signed in with the same Apple ID.
/wp:paragraph
wp:paragraph
However, it will not delete saved passwords, autofill data, or credit card details.
/wp:paragraph
wp:heading {“level”:3}
Optional: Remove Cache Without Deleting History
/wp:heading
wp:paragraph
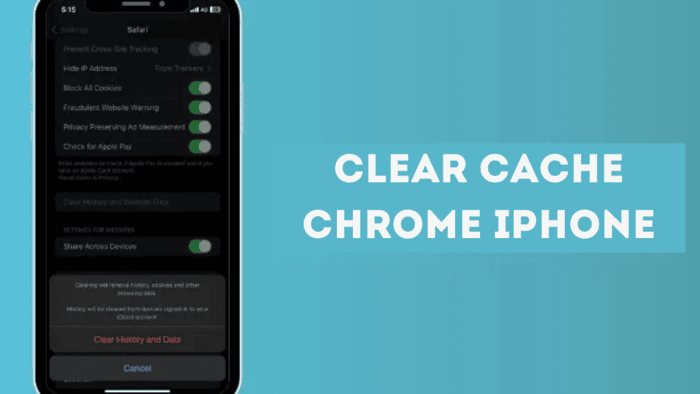
If you want to clear only the cache while keeping your browsing history, follow these steps:
/wp:paragraph
wp:list {“ordered”:true}
- wp:list-item
- Open Settings and tap Safari.
- Scroll down and tap Advanced.
- Select Website Data.
- Tap Remove All Website Data to delete cache files without erasing history.
/wp:list-item
wp:list-item
/wp:list-item
wp:list-item
/wp:list-item
wp:list-item
/wp:list-item
/wp:list
wp:image {“id”:12065,”width”:”612px”,”height”:”auto”,”sizeSlug”:”full”,”linkDestination”:”media”,”align”:”center”}
/wp:image
wp:heading
Clearing Cache in Google Chrome
/wp:heading
wp:paragraph
If you use Google Chrome on your iPhone, clearing cached data is just as easy.
/wp:paragraph
wp:paragraph
Keep in mind that if you’re signed in with a Google account, deleting this data will affect Chrome across all devices connected to that account.
/wp:paragraph
wp:heading {“level”:3}
Step 1: Open Chrome
/wp:heading
wp:paragraph
Find and open the Google Chrome app, which has a red, green, yellow, and blue circular icon.
/wp:paragraph
wp:heading {“level”:3}
Step 2: Access the Menu
/wp:heading
wp:paragraph
Tap the three horizontal dots (⋮) located at the bottom-right corner of the screen to open the menu.
/wp:paragraph
wp:heading {“level”:3}
Step 3: Select “History”
/wp:heading
wp:paragraph
From the menu that appears, tap History to view your browsing data.
/wp:paragraph
wp:heading {“level”:3}
Step 4: Tap “Clear Browsing Data”
/wp:heading
wp:paragraph
At the bottom-left corner of the History page, tap Clear Browsing Data.
/wp:paragraph
wp:heading {“level”:3}
Step 5: Choose What to Delete
/wp:heading
wp:paragraph
By default, Chrome will mark the following for deletion:
/wp:paragraph
wp:list
- wp:list-item
- Browsing history
/wp:list-item
/wp:list
wp:paragraph
/wp:paragraph
wp:list
- wp:list-item
- Cookies and site data
/wp:list-item
/wp:list
wp:paragraph
/wp:paragraph
wp:list
- wp:list-item
- Cached images and files
/wp:list-item
/wp:list
wp:paragraph
If you only want to remove cached files, uncheck everything except Cached Images and Files.
/wp:paragraph
wp:paragraph
Be cautious not to select Saved Passwords or Autofill Data, as those contain stored login credentials and addresses.
/wp:paragraph
wp:heading {“level”:3}
Step 6: Confirm Deletion
/wp:heading
wp:paragraph
Tap Clear Browsing Data, then confirm by tapping the button again when prompted. This will permanently remove the selected data from Chrome.
/wp:paragraph
wp:heading
Clearing Cache in Mozilla Firefox
/wp:heading
wp:paragraph
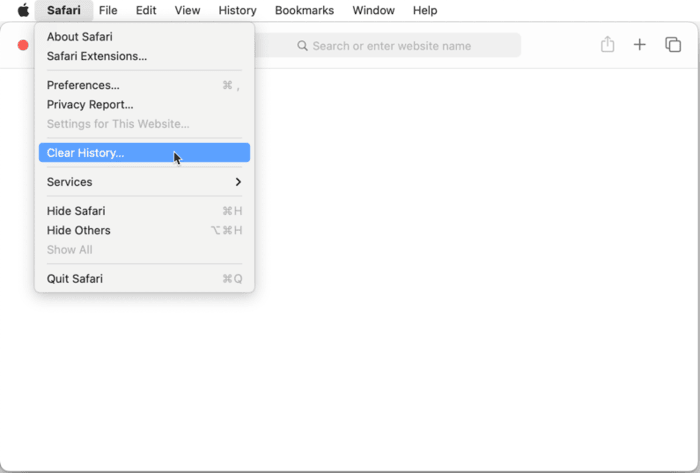
Mozilla Firefox offers a straightforward way to delete cache and browsing data while allowing users to keep certain information if needed. Here’s how:
/wp:paragraph
wp:heading {“level”:3}
Step 1: Open the Firefox App
/wp:heading
wp:paragraph
Locate and launch the Firefox browser, represented by an orange fox wrapped around a purple globe.
/wp:paragraph
wp:heading {“level”:3}
Step 2: Open the Menu
/wp:heading
wp:paragraph
Tap the three horizontal lines (☰) at the bottom-right corner of the screen to open Firefox’s main menu.
/wp:paragraph
wp:heading {“level”:3}
Step 3: Select “Settings”
/wp:heading
wp:paragraph
Scroll through the menu and tap Settings, which is located near the bottom.
/wp:paragraph
wp:heading {“level”:3}
Step 4: Tap “Data Management”
/wp:heading
wp:paragraph
Under the Privacy section, tap Data Management to access the options for clearing cache and other browsing data.
/wp:paragraph
wp:heading {“level”:3}
Step 5: Select the Data to Delete
/wp:heading
wp:paragraph
Firefox will display various categories of data, such as:
/wp:paragraph
wp:list
- wp:list-item
- Browsing history
/wp:list-item
/wp:list
wp:paragraph
/wp:paragraph
wp:list
- wp:list-item
- Cookies
/wp:list-item
/wp:list
wp:paragraph
/wp:paragraph
wp:list
- wp:list-item
- Cached web content
/wp:list-item
/wp:list
wp:paragraph
/wp:paragraph
wp:list
- wp:list-item
- Downloaded files
/wp:list-item
/wp:list
wp:paragraph
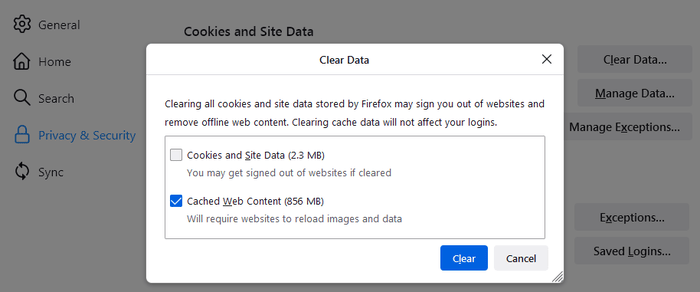
Ensure that Cached Web Content is selected while leaving other options unchecked if you don’t want to erase additional data.
/wp:paragraph
wp:heading {“level”:3}
Step 6: Tap “Clear Private Data”
/wp:heading
wp:paragraph
Once you’ve selected what to delete, tap Clear Private Data, which appears in red at the bottom of the screen.
/wp:paragraph
wp:heading {“level”:3}
Step 7: Confirm by Tapping “OK”
/wp:heading
wp:paragraph
A confirmation pop-up will appear, warning that this action cannot be undone. Tap OK to finalize the deletion.
/wp:paragraph
wp:paragraph
If you’re signed into Firefox with a Mozilla account, clearing your cache will also remove this data from other synced devices.
/wp:paragraph
wp:image {“id”:12064,”width”:”660px”,”height”:”auto”,”sizeSlug”:”full”,”linkDestination”:”media”,”align”:”center”}
/wp:image
wp:heading
Clearing Cache in Microsoft Edge
/wp:heading
wp:paragraph
Microsoft Edge users can easily remove cached files to improve browser speed and free up space.
/wp:paragraph
wp:paragraph
If you use Edge with a Microsoft account, note that clearing data will also sync changes across all logged-in devices.
/wp:paragraph
wp:heading {“level”:3}
Step 1: Open the Microsoft Edge App
/wp:heading
wp:paragraph
Find and open the Microsoft Edge browser, which has a blue and green wave logo.
/wp:paragraph
wp:heading {“level”:3}
Step 2: Open the Menu
/wp:heading
wp:paragraph
Tap the three horizontal lines (☰) at the bottom-right corner of the screen to bring up the menu.
/wp:paragraph
wp:heading {“level”:3}
Step 3: Select “History”
/wp:heading
wp:paragraph
Tap History at the top of the menu to access your browsing records.
/wp:paragraph
wp:heading {“level”:3}
Step 4: Tap the Trash Can Icon
/wp:heading
wp:paragraph
At the top-right corner of the screen, tap the trash can icon to delete browsing data.
/wp:paragraph
wp:heading {“level”:3}
Step 5: Choose Data to Remove
/wp:heading
wp:paragraph
Edge allows users to delete different types of data. By default, the following options are checked:
/wp:paragraph
wp:list
- wp:list-item
- Browsing history
/wp:list-item
/wp:list
wp:paragraph
/wp:paragraph
wp:list
- wp:list-item
- Cookies and other site data
/wp:list-item
/wp:list
wp:paragraph
/wp:paragraph
wp:list
- wp:list-item
- Cached images and files
/wp:list-item
/wp:list
wp:paragraph
If you only want to clear the cache, deselect everything except Cached Images and Files.
/wp:paragraph
wp:paragraph
Avoid selecting Passwords or Autofill Form Data unless you want to erase saved login credentials and personal details.
/wp:paragraph
wp:heading {“level”:3}
Step 6: Confirm by Tapping “Clear Now”
/wp:heading
wp:paragraph
Scroll to the bottom and tap Clear Now to proceed.
/wp:paragraph
wp:heading {“level”:3}
Step 7: Tap “Clear Now” Again
/wp:heading
wp:paragraph
A final confirmation prompt will appear. Tap Clear Now again to delete the selected data.
/wp:paragraph
wp:heading
Final Thoughts
/wp:heading
wp:paragraph
Regularly clearing your browser cache on an iPhone can help improve performance, resolve loading issues, and enhance privacy.
/wp:paragraph
wp:paragraph
Each browser has slightly different steps for clearing cached data, but the process is generally straightforward.
/wp:paragraph
wp:paragraph
Whether you use Safari, Chrome, Firefox, or Edge, following these instructions will allow you to free up space and ensure a smoother browsing experience.
/wp:paragraph
wp:paragraph
If you frequently run into slow page loads or outdated website content, consider setting a schedule to clear your cache every few weeks.
/wp:paragraph
wp:paragraph
This will help maintain your browser’s speed and efficiency while keeping your personal data secure.
/wp:paragraph