Jamie
Jamiewp:paragraph
As the new year begins, it’s an ideal moment to arrange your daily routine and streamline your electronic gadgets.
/wp:paragraph
wp:paragraph
Many users notice their mobile gadgets slowing down over time. Fortunately, a few simple solutions can improve performance.
/wp:paragraph
wp:paragraph
Turning the device off and back on can resolve common issues while erasing stored data from applications and web pages helps reclaim space and enhance responsiveness.
/wp:paragraph
wp:paragraph
The guide below details how to erase temporary files and navigate to the appropriate options on Android systems.
/wp:paragraph
wp:paragraph
The procedure may vary depending on the manufacturer and operating system, but the approach remains unchanged. These steps will help streamline the process.
/wp:paragraph
wp:paragraph
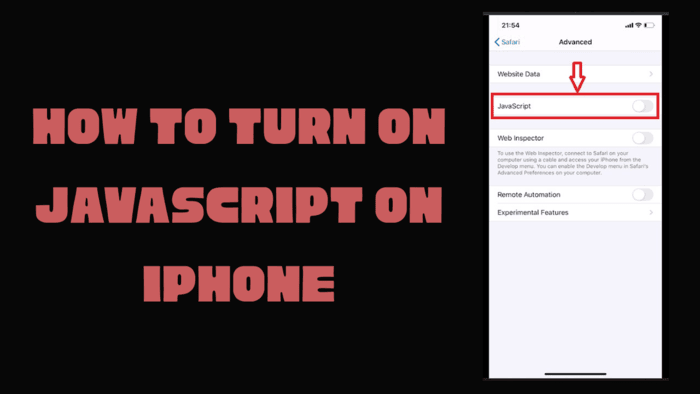
For iPhone users, removing stored data on iOS follows a separate procedure.
/wp:paragraph
wp:image {“id”:12201,”width”:”666px”,”height”:”auto”,”sizeSlug”:”full”,”linkDestination”:”media”,”align”:”center”}

/wp:image
wp:heading
Delete Cached Data on Android Apps
/wp:heading
wp:paragraph
What You Need: You just require a mobile device or tablet running the Android system with the relevant applications installed.
/wp:paragraph
wp:paragraph
The procedure might change depending on the specific device model and software version.
/wp:paragraph
wp:heading {“level”:3}
1. Find All Installed Apps
/wp:heading
wp:paragraph
Open the device’s settings to find all the programs on your Android phone. Scroll down, select the memory option, and tap on installed programs.
/wp:paragraph
wp:paragraph
If the memory option isn’t available, go directly to the installed programs section from the settings menu.
/wp:paragraph
wp:paragraph
Hint: If you have trouble finding the installed programs section, use the lookup tool in settings.
/wp:paragraph
wp:paragraph
Various editions of the Android system offer a way to organize applications by storage capacity.
/wp:paragraph
wp:paragraph
To do this, access the menu in the upper-right area and pick the setting that arranges apps according to their file size.
/wp:paragraph
wp:paragraph
However, this feature may not be on Google’s Pixel devices running the Android 15 version.
/wp:paragraph
wp:heading {“level”:3}
2. Delete Cache for Apps on Your Android
/wp:heading
wp:paragraph
Select software from the provided list to remove temporary files. Going for one you installed instead of a default system feature is advisable, as deleting cached data from built-in functions may not always yield the desired results.
/wp:paragraph
wp:paragraph
Giving priority to manually installed software is a more dependable option.
/wp:paragraph
wp:paragraph
Upon opening a program, you’ll find details such as its occupied storage, saved preferences, temporary file size, and overall memory consumption.
/wp:paragraph
wp:paragraph
You will see two choices in the upper section: Delete stored data and Clear temporary files.
/wp:paragraph
wp:paragraph
Press “Erase Temporary Data” to discard stored files. Steer clear of “Reset App” since it restores default settings, requiring reconfiguration. Removing temporary data will not create any complications.
/wp:paragraph
wp:heading {“level”:3}
3. Repeat for Other Apps on Your Android
/wp:heading
wp:paragraph
Review your installed applications, identify those consuming significant storage, and clear their cache.
/wp:paragraph
wp:paragraph
You can remove temporary files for all applications, but starting with those that consume the most storage, such as Facebook, is advisable.
/wp:paragraph
wp:image {“id”:12202,”width”:”664px”,”height”:”auto”,”sizeSlug”:”full”,”linkDestination”:”media”,”align”:”center”}

/wp:image
wp:heading
Clear Cache in Chrome on Android
/wp:heading
wp:paragraph
Essential Information: Your mobile device stores data within the Chrome browser as you use it frequently.
/wp:paragraph
wp:paragraph
Excessive data storage can hinder your device’s performance. Follow these instructions to remove the stored data.
/wp:paragraph
wp:heading {“level”:3}
1. Open History Settings
/wp:heading
wp:paragraph
Open the Chrome browser on your smartphone. Click the menu icon at the upper-right corner, navigate to the History section, and then select the option to remove your browsing information.
/wp:paragraph
wp:heading {“level”:3}
2. Select Data to Delete
/wp:heading
wp:paragraph
A selection of choices will appear, allowing you to pick the information to delete.
/wp:paragraph
wp:paragraph
You can also define a specific period for removal. Each option comes with a brief explanation of its effect.
/wp:paragraph
wp:paragraph
For instance, clearing browsing data and website details will log you out of most services. Erasing cached media and documents may cause slower image loading on future visits to a page.
/wp:paragraph
wp:paragraph
Choose the information to delete, set a time frame, and press the button to remove the data at the lower part.
/wp:paragraph
wp:heading
Optional: A Quick Way to Clear Cache
/wp:heading
wp:paragraph
In the latest versions of Chrome for mobile devices, tapping the menu icon reveals an option to clear browsing history.
/wp:paragraph
wp:paragraph
Choosing this opens a window that allows you to delete data from a specific time range.
/wp:paragraph
wp:paragraph
By selecting additional settings, a page appears where you can choose what data to remove and set the desired time frame.
/wp:paragraph